Overview
The Kernel Deposit System automatically imports information on research results from researchmap. It allows users to easily check their open access status and deposit them in the Kobe University Repository Kernel.
Users can deposit all research results via this system, not just those subjects of “Immediate Open Access Mandate“.
For more details about this system, refer to the manual below.
Manual
- Login
- Interface
- Deposit Articles Listed as “Not Registered”
- Deposit Evidence Data for Articles
- Register New Article Data
- Deposit Research Data
- Generate Secret URL
- Add / Replace Files
- Apply for Metadata Closure
- Deposit Request by an Agent
- Reference Information
1. Login
Please log in on the login page with your ID and password, then select “Kernel Deposit System”.
Note: This system is available only to users whose information is registered in KUID.
If you are not listed in KUID, please submit your application using the web form.
2. Interface
- ○ Process Phases
- The buttons at the top of the screen indicate the current processing phase. Please refer to the table below for details about each phase.
| Process Phases |
Description |
| All |
All research results |
| Not Registered |
Research results not deposited in Kernel and not available via open access |
| Open Access ※ |
Open access research results not included in Kernel |
| Application in progress |
Research results whose metadata have been entered / modified but whose files have not yet been uploaded |
| Library processing |
Research results currently being processed by the library |
| Awaiting deposit |
Research results for which a secret URL has been issued |
| Registered |
Research results registered in Kernel |
| Closed |
Research results applied for closure |
Selecting “Except hidden data” changes the display status of hidden research results
This system uses the Unpaywall REST API to determine whether a publication is Open Access.
For details on how the Unpaywall REST API makes this determination, please refer to the official documentation.
Based on the values returned by the Unpaywall REST API, a publication is considered Open Access if it meets any of the following conditions:
(1) “oa_status” is “green”の
(2) “url_for_pdf” contains “jst.go.jp”
(3) “oa_status” is “gold” or “hybrid”, and “license” is not “null”
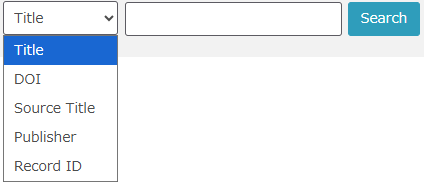
○ Search
Using the “Search” function, you can filter research results based on your search criteria.
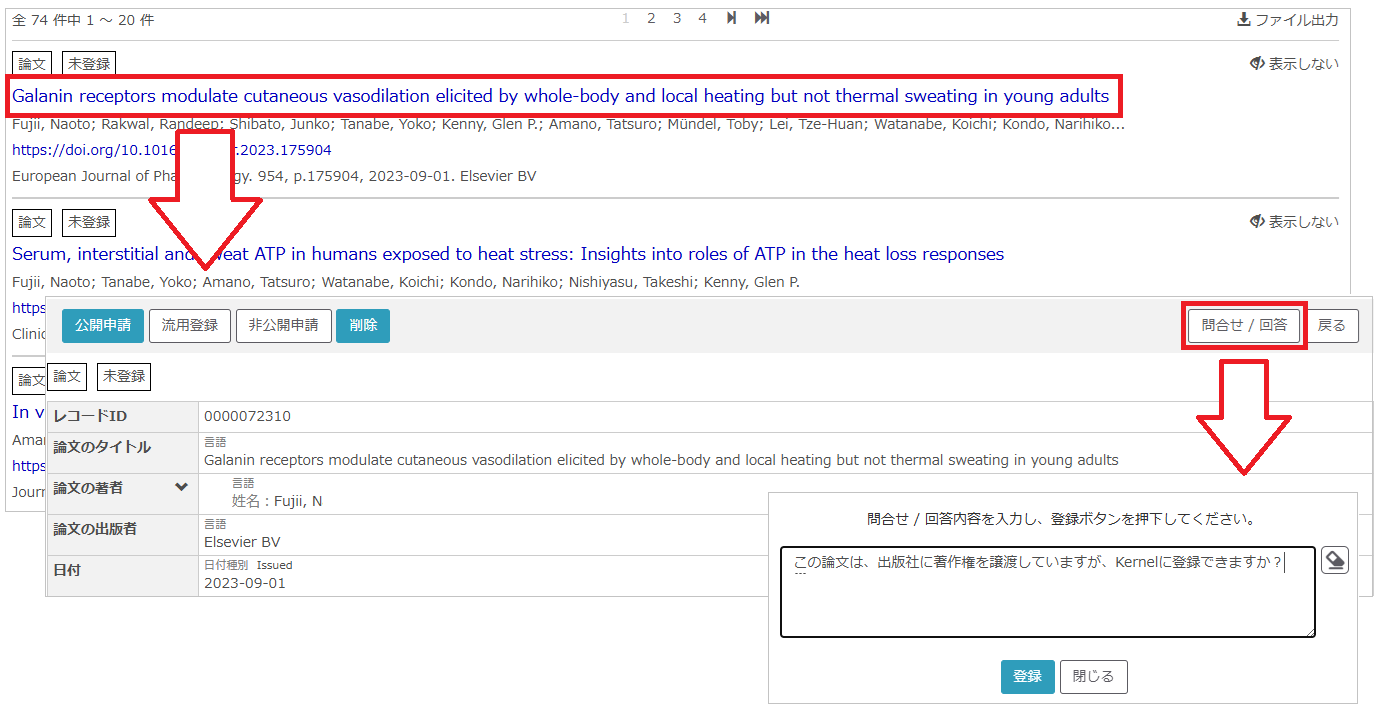
 ○ Inquiry to the library
To make an inquiry, click the title of the research result you wish to inquire about to open the detail screen, and then click the “Inquiry / Answer” button to display a pop-up window.
○ Inquiry to the library
To make an inquiry, click the title of the research result you wish to inquire about to open the detail screen, and then click the “Inquiry / Answer” button to display a pop-up window.
Enter your inquiry in the window and click “Deposit” to send it to the library. You will also receive the library’s response by email.
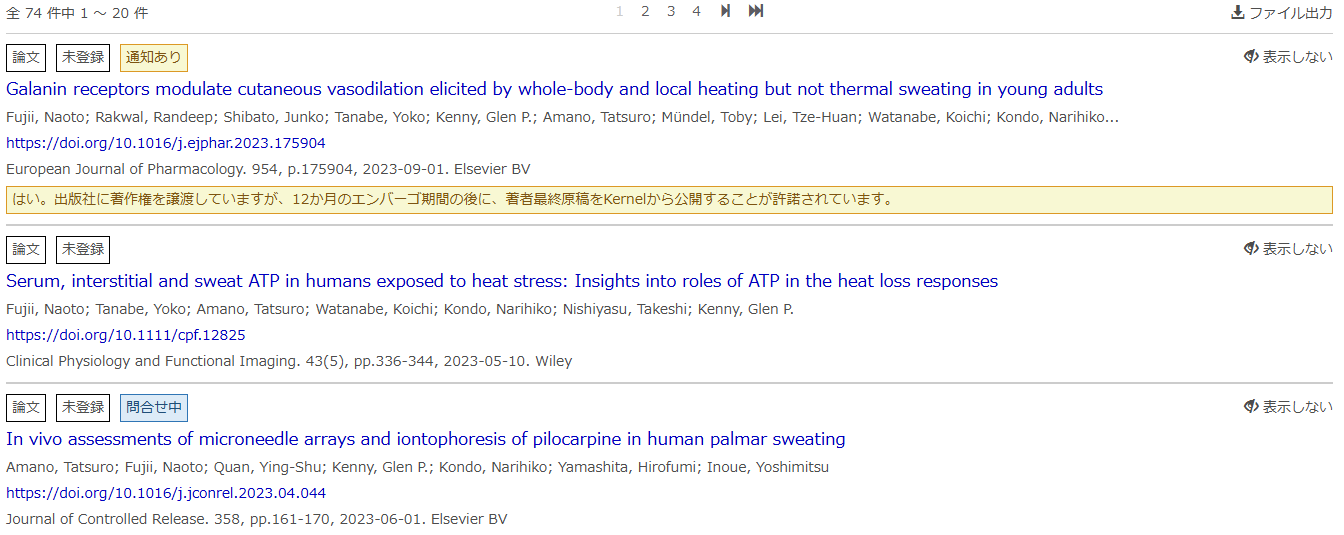
 ○ Tags
Tags are assigned to research results for which you have made an inquiry to the library or to which the library has responded.
○ Tags
Tags are assigned to research results for which you have made an inquiry to the library or to which the library has responded.
Research results with the “Notice” tag are displayed at the top of the list with priority.
Reference: About Automatically Harvested Data
The list of research results in the Kernel Deposit System is generated based on the “Papers” and “Misc.” information registered in researchmap.
If a research result in researchmap includes a DOI, the system automatically retrieves additional details from various databases using the DOI and formats the metadata accordingly.
Therefore, when registering your research results in researchmap, please include the DOI whenever possible.
Reference: About the Sorting Order
The research results are displayed in the following priority:
Items with the “Notice” tag > Processing phase > Record ID
The order of the processing phases is:
Application in progress > Library processing > Awaiting deposit > Not registered > Open Access > Registered
Since Record IDs are assigned automatically in the order of registration, newer items appear above older ones when the processing phase is the same.
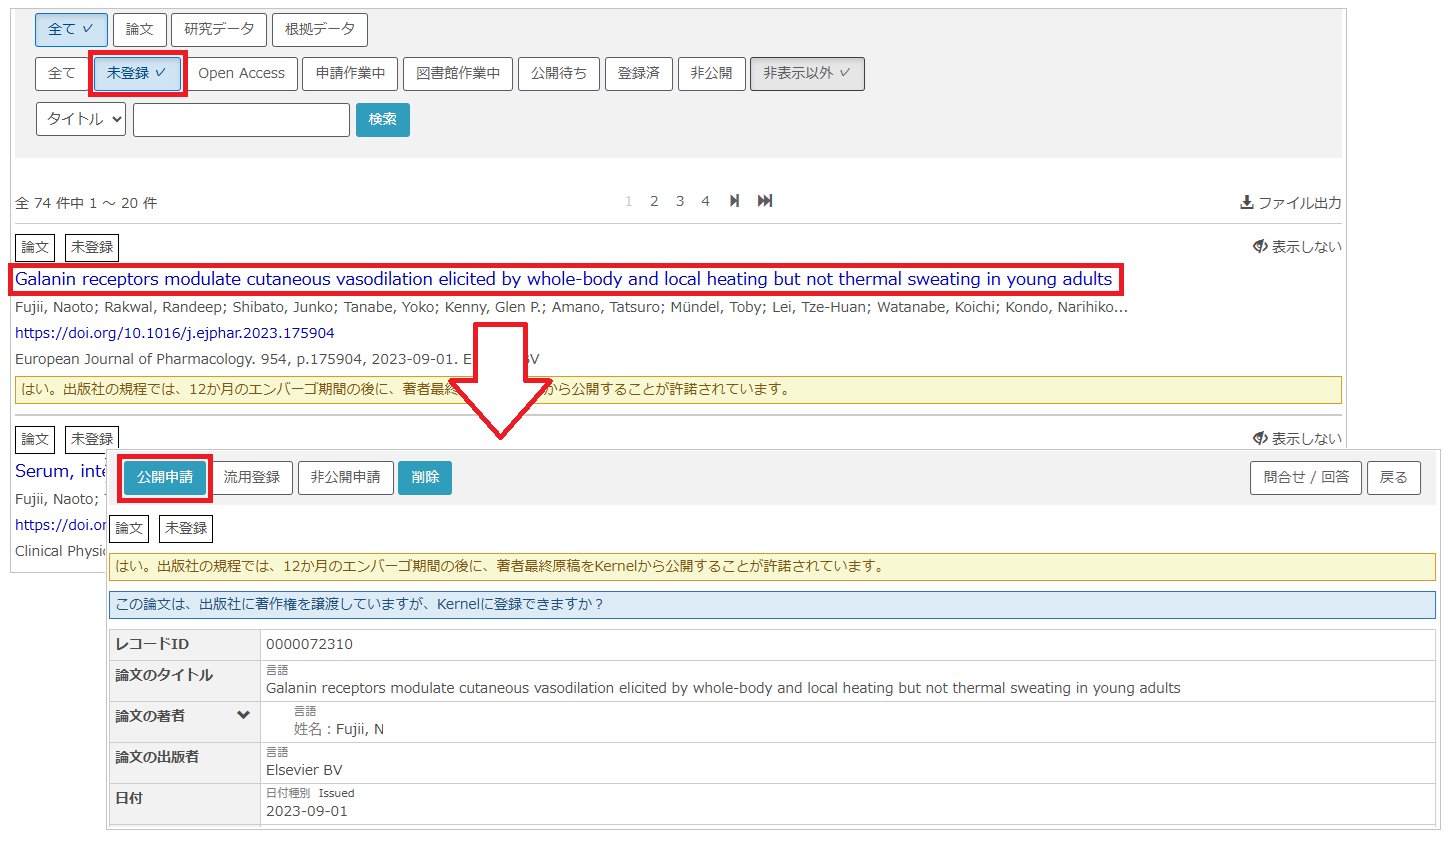
3. Deposit Articles Listed as “Not Registered”
Research results listed as “Not Registered” are items that are not freely accessible on the web.
You can make these items publicly available by submitting a deposit application and upload the accepted manuscript (AM) for the article from this list.
- From the “Not Registered” list, click the title of the research result you wish to make public, then click the “Deposit” button on the detail screen.
- On the “Metadata Entry” screen, review the metadata and if everything is correct, click “Next”. If you enter the DOI of the research result and click “Retrieve Metadata”, the metadata may be automatically modified / populated.
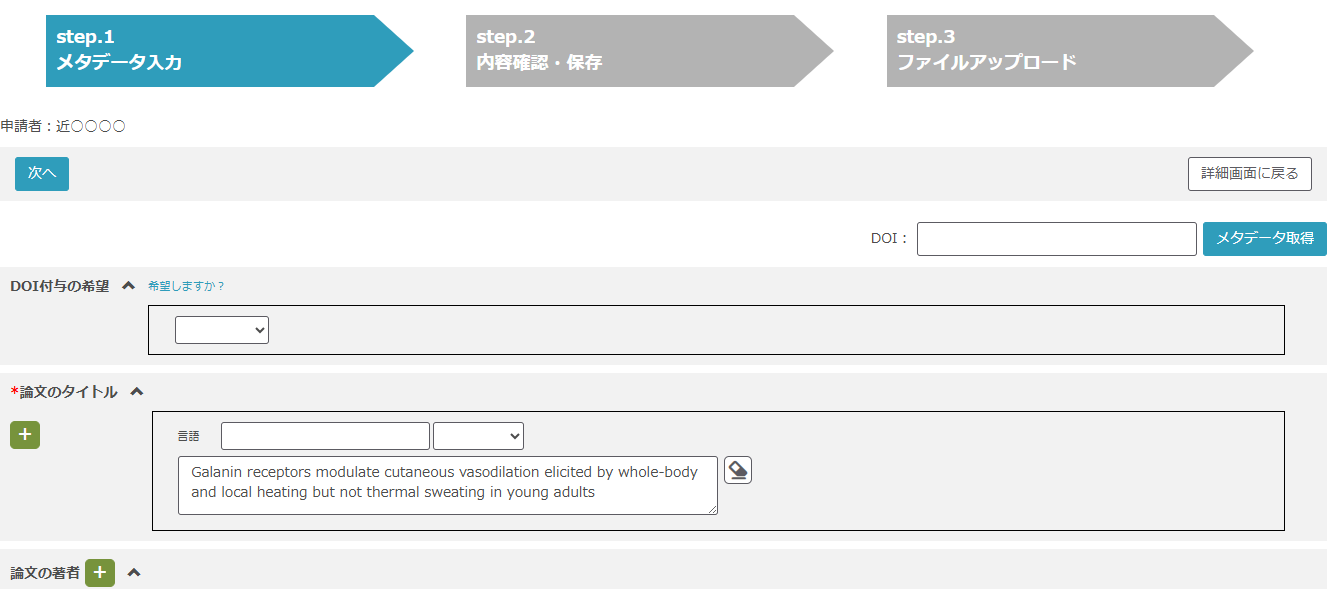
Note: If you select “Yes” for “DOI Registration”, the library will assign a JaLC DOI if the research result does not already have one. (If the Version of Record (VoR) already has a DOI, a separate DOI can still be assigned to the AM.)
Items without a JaLC DOI will also be assigned a Handle URL, which is a permanent identifier. For more details about DOI, please refer to “DOIとは(JaLC)“
- If the displayed information is correct, click “Save and Next”. To modify the metadata, click “Back to Previous Page”.
- On the “Upload Files” screen, click “Add files”, upload the AM file of the article, and then click “Deposit”.
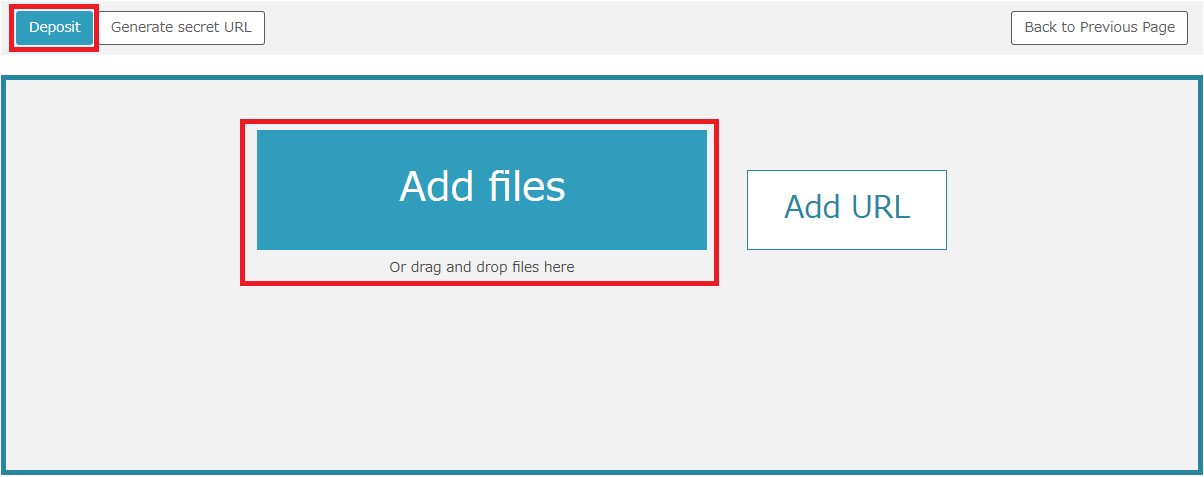
- A confirmation pop-up will appear. Review the contents, and if everything is correct, check the box and upload the file.
Reference: What is an Accepted Manuscript
An accepted manuscript (AM) is a version of a manuscript that has been peer-reviewed and accepted by a journal, but has not yet undergone copyediting or typesetting by the publisher.
Many publishers allow authors to deposit this version in institutional repositories.
Therefore, neither the proof version nor the final published version (Version of Record; VoR) qualifies as an AM and is generally not allowed to be deposited in institutional repositories.
On the other hand, a manuscript before peer review is called a preprint or SMUR, and it is also not regarded as an AM.
In some scientific fields, it has become common practice to publish a preprint on a preprint server before submitting the article to a journal for peer review.

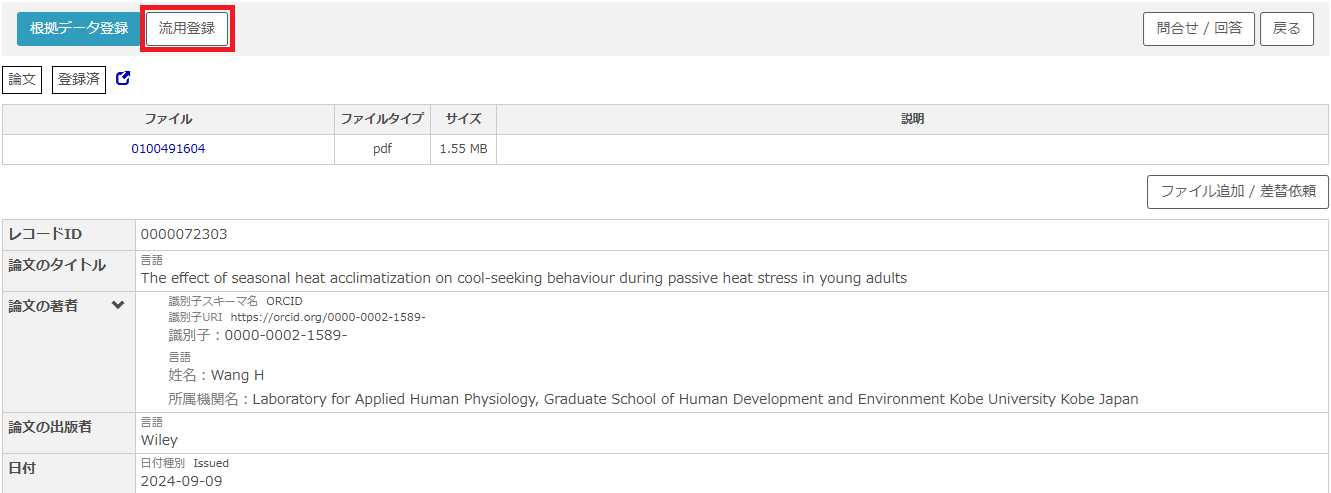
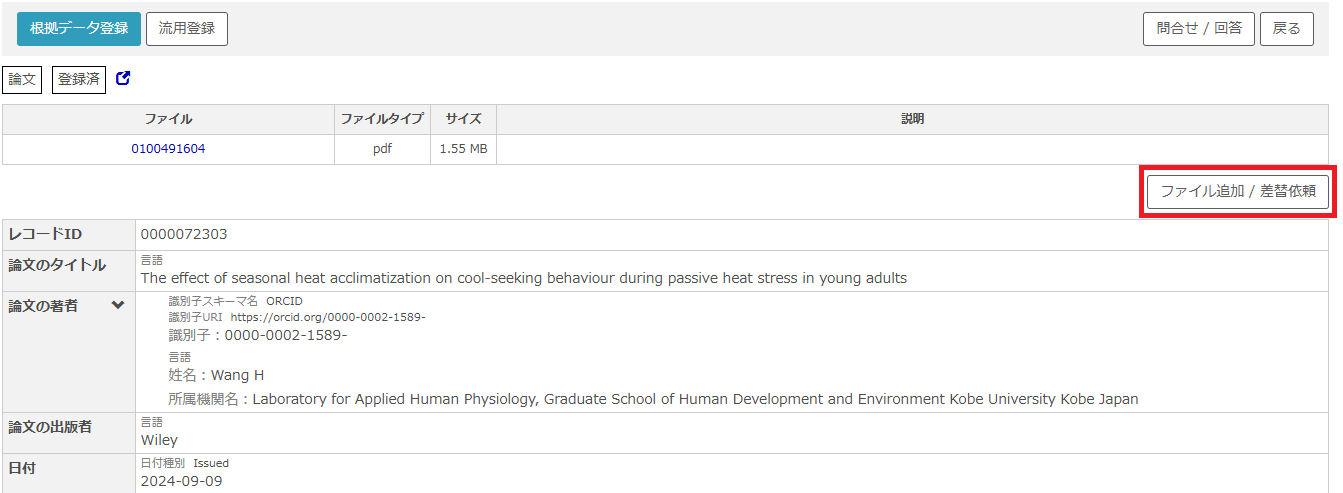
4. Deposit Evidence Data for Articles
You can deposit evidence data for articles whose status is “Library processing” and “Registered”, similar to the process described in “3. Deposit Articles Listed as “Not Registered”“.
Note: Evidence data refers to research data required by journals or publishers to ensure transparency and reproducibility.
- From “Registered” or “Library processing” list, click title of the article you wish to deposit evidence data for, and open the detailed screen.
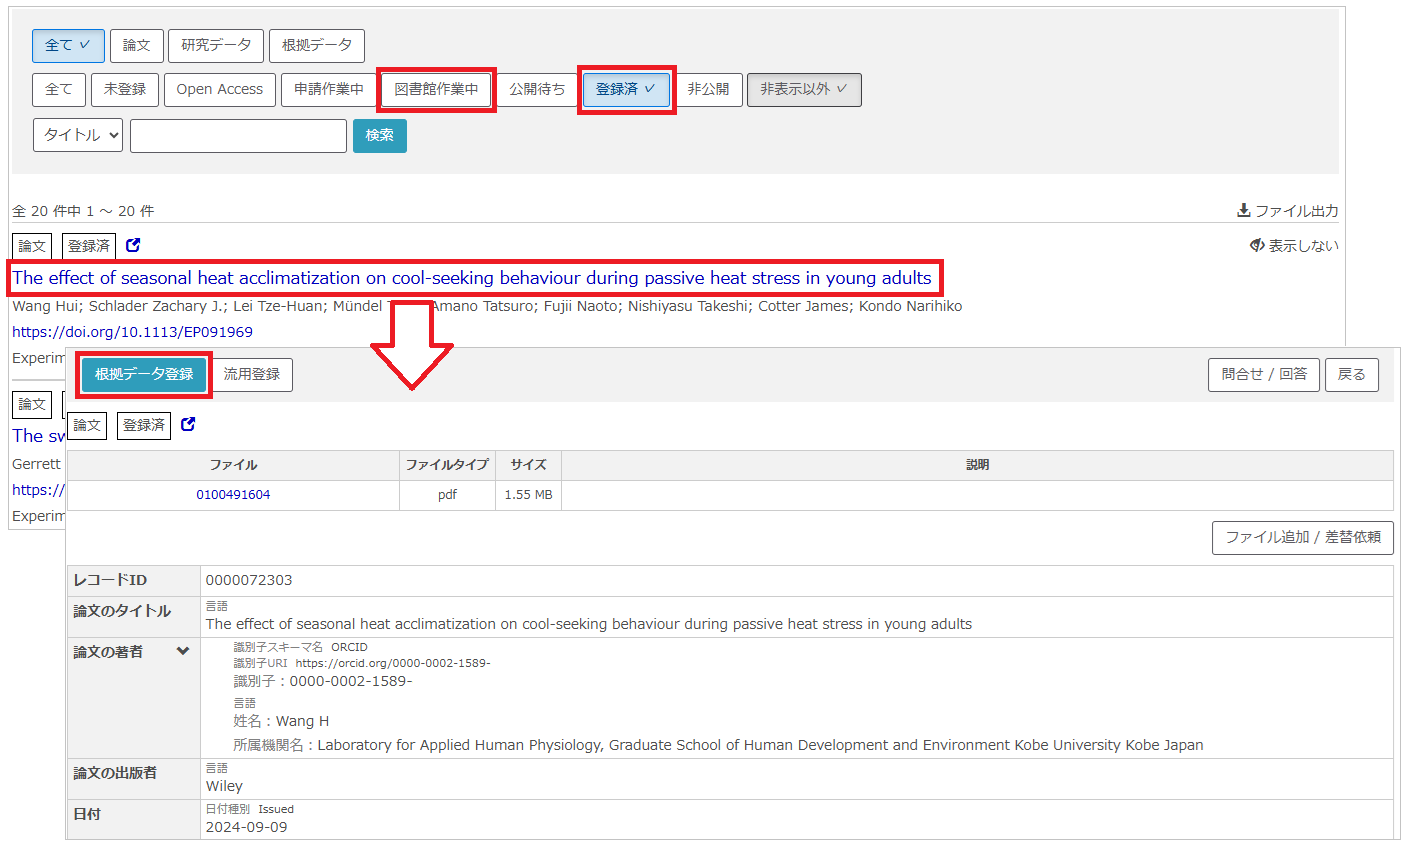
- Click “Deposit evidence data” at the upper left of the detailed screen.
- On the “Metadata Entry” screen, enter the necessary metadata and click “Next”.
Title, publisher and issued data are required fields. Please also provide a brief description of the data so that users can understand its content.
Note: If you select “Yes” for “DOI Registration”, the library will assign a JaLC DOI if the research result does not already have one. (If the Version of Record (VoR) already has a DOI, a separate DOI can still be assigned to the AM.)
Items without a JaLC DOI will also be assigned a Handle URL, which is a permanent identifier. For more details about DOI, please refer to “DOIとは(JaLC)“
- If the displayed information is correct, click “Save and Next”. To modify the metadata, click “Back to Previous Page”.
- On the “Upload Files” screen, click “Add files”, upload evidence data file, and then click “Deposit”.
Note: The maximum file size is 5GB
5. Register New Article Data
In addition to the information automatically harvested from researchmap, you can manually register new research results that are not included in the list.
- Click “Add to list”
- Select “Article” and click “Next”

- On the “Metadata Entry” screen, enter the necessary metadata and click “Next”. If the article has a DOI, enter it in the “DOI” field and click “Retrieve Metadata”. The article information will then be automatically populated.
Note: If you select “Yes” for “DOI Registration”, the library will assign a JaLC DOI if the research result does not already have one. (If the Version of Record (VoR) already has a DOI, a separate DOI can still be assigned to the AM.)
Items without a JaLC DOI will also be assigned a Handle URL, which is a permanent identifier. For more details about DOI, please refer to “DOIとは(JaLC)“
- If the displayed information is correct, click “Save and Next”. To modify the metadata, click “Back to Previous Page”.
- On the “Upload Files” screen, click “Add files”, upload the evidence data file, and then click “Deposit”.
- A confirmation pop-up will appear. Review the contents, and if everything is correct, check the box and upload the file.
Reference: Reusing Metadata
You can reuse existing metadata when adding new articles or research data.
- Click the title of the article or research data you wish to reuse and open its detail screen, then click “Reuse & deposit”
- On the “Metadata Entry” screen, modify the necessary metadata and click “Next”.
- Reviewing metadata and click “Save & Next”, upload file(s) and apply for deposit it.
6. Deposit Research Data
When depositing research data other than evidence data, follow the steps below.
- Click “Add to list”
- Select “Research data” and click “Next”
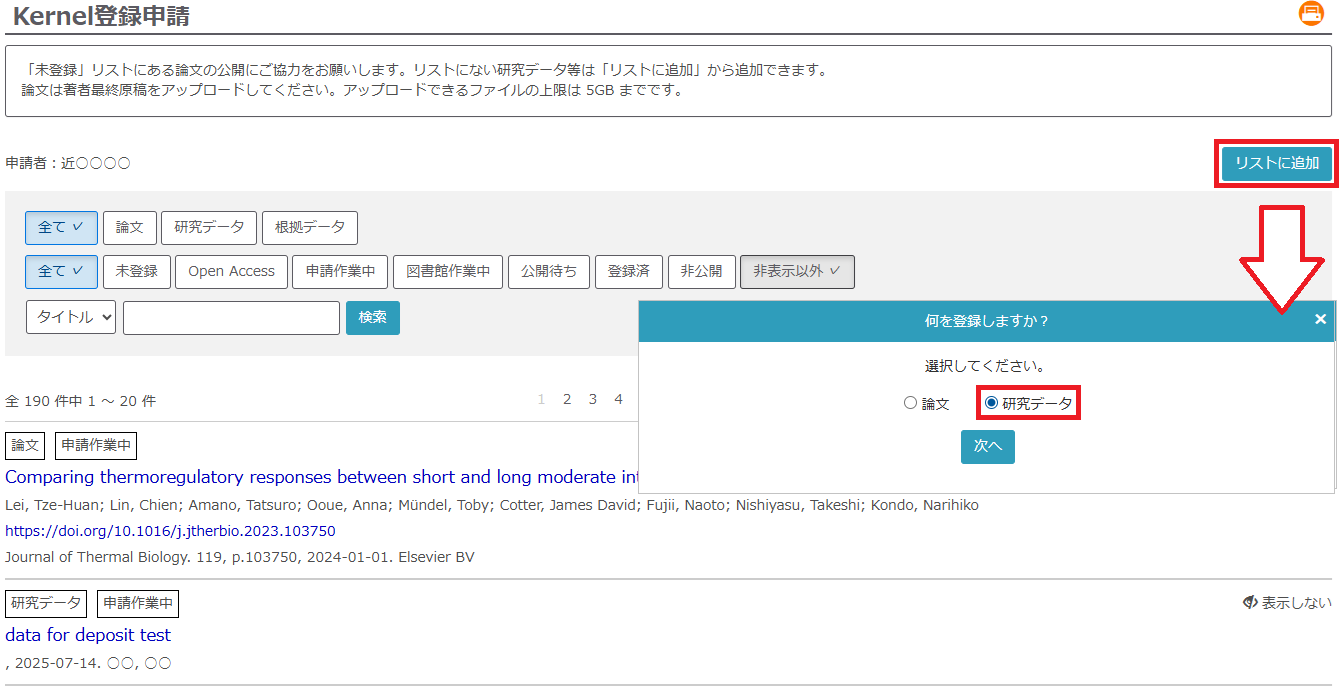
- On the “Metadata Entry” screen, enter the necessary metadata and click “Next”.
Title, publisher and issued data are required fields. Please also provide a brief description of the data so that users can understand its content.
Note: If you select “Yes” for “DOI Registration”, the library will assign a JaLC DOI if the research result does not already have one. (If the Version of Record (VoR) already has a DOI, a separate DOI can still be assigned to the AM.)
Items without a JaLC DOI will also be assigned a Handle URL, which is a permanent identifier. For more details about DOI, please refer to “DOIとは(JaLC)“
- If the displayed information is correct, click “Save and Next”. To modify the metadata, click “Back to Previous Page”.
- On the “Upload Files” screen, click “Add files”, upload the research data file, and then click “Deposit”.
Note: The maximum file size is 5GB
Reference: About Data Repositories
In addition to registering your research data in Kernel, you can also use external data repositories.
Some journals or publishers may require you to deposit your data in a specific repository, so please check and follow their guidelines first.
Here are some widely used general-purpose data repositories:
Zenodo / figshare / Dryad
You can also search for discipline-specific repositories using the registry “re3data.org“.
7. Generate Secret URL
By generating a secret URL, you can grant access to your articles or research data only to those who have the link.
This feature is useful for sharing files with peer reviewers or co-authors during the review process.
- Follow the steps in sections “3. Deposit Articles Listed as “Not Registered” through “6. Deposit Research Data” until you reach the “Upload Files” screen.
- Click “Add File” to upload the article or research data you want to share, then click “Generate secret URL”.
- A notice will appear. Review the information, check all the boxes, and click “Upload Files”.
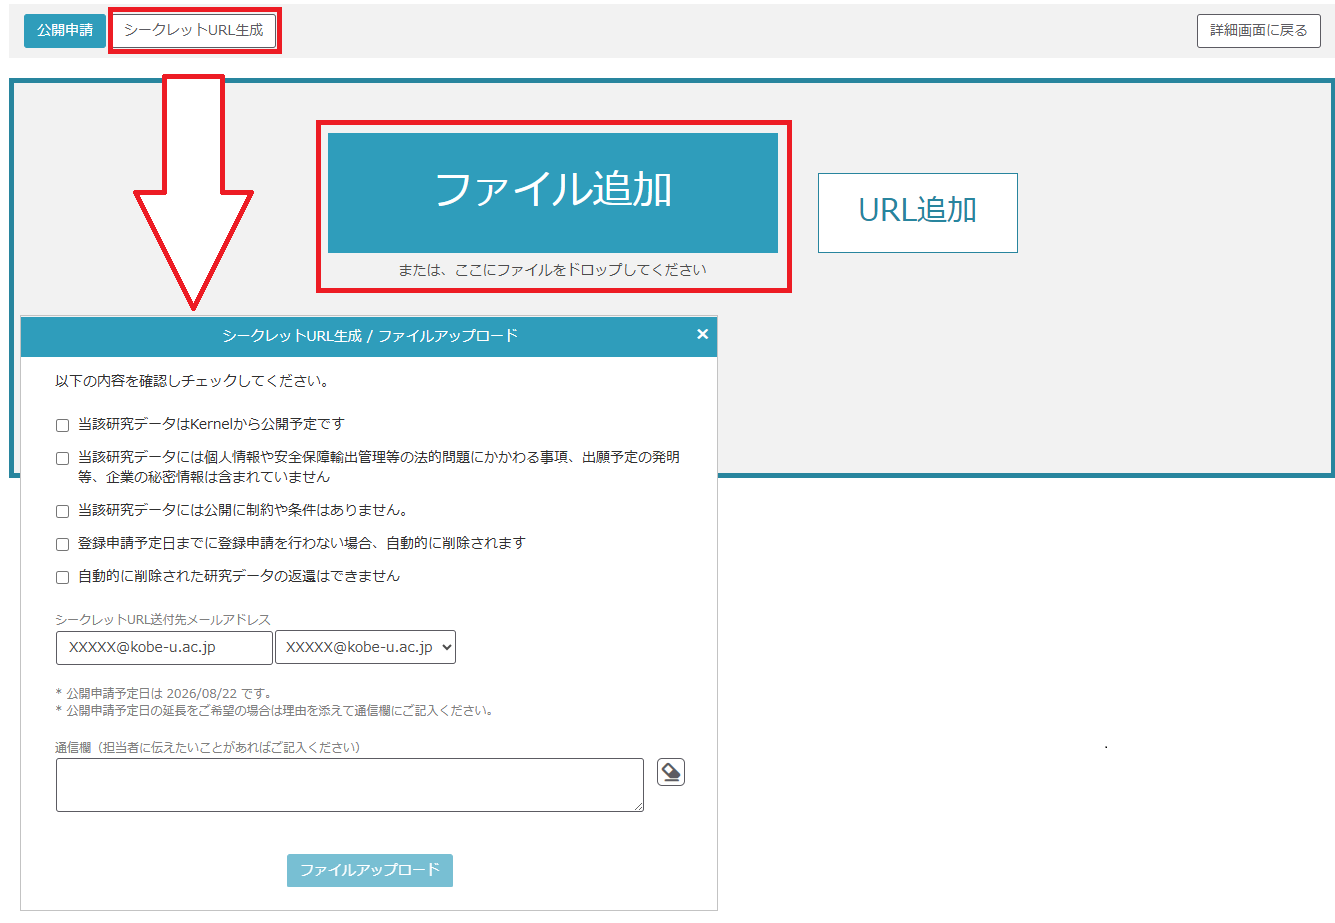
- An email containing the secret URL and password will be sent to the specified email address. Please share these details with the people you want to give access to.
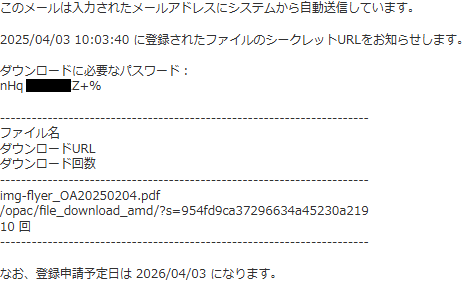
Note: About Generating a Secret URL
- Each secret URL is valid for 12 months and allows up to 10 downloads.
- You can generate a new secret URL for the same file, but the URL will change each time.
- Please deposit the file associated with the secret URL before the scheduled date.
- If the file is not deposited by the scheduled date, it will be automatically deleted.
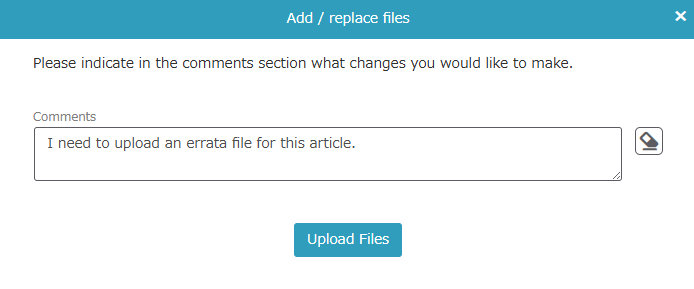
8. Add / Replace Files
Using the “Add / Replace Files” feature, you can upload add errata or additional research data to existing articles or datasets.
- Click the title of the item you want to update in the “Registered” list.
Note: Items with the status “Library proceeding” and “Awaiting deposit” are also eligible for this feature.
- Click “Add / Replace Files”.
- Upload the file by clicking “Add file”. Then click “Add / Replace” and provide the reason for adding or replacing the file in the comment box before completing the upload.
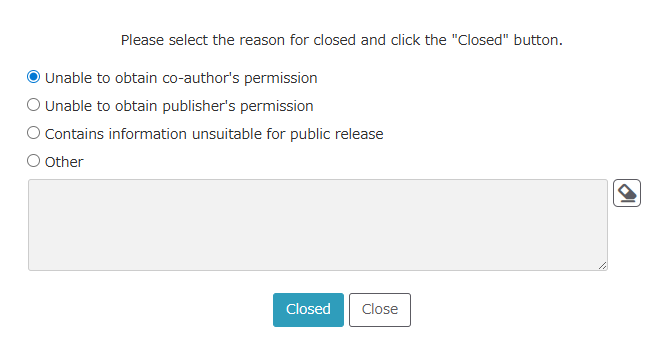
9. Apply for Metadata Closure
If you do not wish to register certain items, or if circumstances prevent their publication, you can submit a “Closed” request to move them to the “Closed” list.
- Select the item you want to mark as “Closed” and click its title.
- On the detail page, click the “Closed” button.

- Choose the reason for requesting “Closed” and submit your request.
Reference: Deleting Research Results
If you need to completely remove an item from the list, such as in cases of duplication, you can delete it by clicking the “Delete” button on the item’s detail page.
Please note that deleted data cannot be restored. Whenever possible, consider using the “Hide” or “Closed” feature instead.
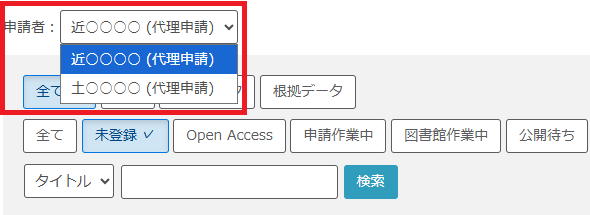
10. Deposit Request by an Agent
Staff members or secretaries can act as agents on behalf of faculty members to process their data.
To use the “Agent” feature, you must apply to the library in advance. In addition, the agent must also be registered as a library user.
- Beforehand, notify the Digital Library Section of the faculty member’s and agent’s information (department, name, staff ID) via the Request form. The library will process the agent registration and inform you once the “Agent” feature becomes available.
- Log in to the Account Service using your ID and password, then select “Kernel Deposit System”.
- After logging in, the faculty member’s list of research results will be displayed. Follow the instructions in this manual to complete the registration process.
If you act on behalf of multiple faculty members, a dropdown menu will appear at the top of the list. Select the appropriate faculty member before proceeding.